I finished my block on the 29th of the month even though I wasn't sure if I was going to get it finished. With Wayne's homecoming, spending time together and getting ready for a party for his guys, I wasn't spending much time stitching or beading. I was glad for the smaller piece and that I had chosen not to work on the tree spirit piece.
I started working on this piece the Thursday I went up to Baltimore to meet and bead with Robin. I only worked on it that Thursday since on Friday with her class I started working on my first totally improvisational piece. If you want to read more about my time with Robin and the beginnings of my box for Wayne you can read about it in my main blog here.
I spent the next weekend mostly in vehicles going up to and back from New England for a friends wedding. Luckily most of the time I wasn't driving and I got all of the stitching on the tree and a good start on the embroidery on my butterfly done.
After getting home from that trip I had a couple of days to clean the house, unpack, teach a class, and run errands before Wayne got home from deployment. I did get more done the following week when he had to go out of town for a couple of days to return some gear and do paperwork.
While it is wonderful to have Wayne home I am still getting used to having him around especially since he is doing most of his working from home and I haven't quite gotten used to him being around so much, he is a wonderful distraction though.
The rest of the bead and thread embroidery have been done a bit here and a bit there as I took the time. Wayne even get to put his 2 cents worth in opinion which I even mostly listen to. The last thing to go on was the Ivy and Ivy leaves. I did them in beads since on the background piece they will be made out of cord with leaves from interfacing.
I still need to trim the felt but will get to that soon. I haven't decided what I want to do for my November piece yet. I am very undecided which comes next. I determined that since I was behind on my blogs and e-mail and haven't worked on my box for Wayne in 3 weeks that I would take a few days and see if one of my blocks spoke to me. I think that maybe I need to catch up with myself.
Remember if you want to see more photos of my Sacred Tree BJP that my Web Gallery has all of the photos I have of it and whenever I take new photos of the piece in process the photos go there first. I have also added some new photos to my website.
My Web Gallery- Includes photos of both of my BJP pages
Artistic Kreations and Passions- my website
Monday, November 3, 2008
Tuesday, September 30, 2008
Getting October Started
I have started October's block a little bit early since I am going to spend the weekend in Baltimore meeting Robin Atkins (our wonderful leader for the BJP). She is going to be teaching classes and giving a presentation about last years BJP for the Needlework Guild there. I get to be her teacher's assistant which should be a lot of fun. Heck just talking and playing show and tell should be a lot of fun. I am really looking forward to my trip.
Since I will be going up there on the 2nd of October I wanted to have my block painted and ready to go. My original plan was to do my Tree Spirit this month but since I am going to be away from home the next 2 weekends and then having Wayne come home and there are some challenges to doing my tree spirit the way I want to I thought that maybe I should pick a month where things would be a little less hectic (if I can find any). Then I had to figure out which of the other blocks might feel right at this point. I have not assigned any particular blocks to specific months.
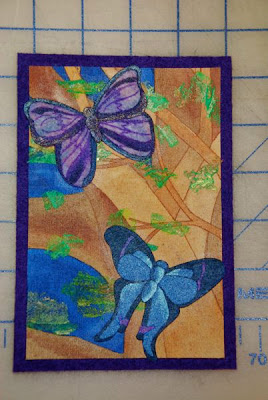
I chose the Butterflies since I wanted to do 2 butterflies to represent Wayne and me. With his homecoming happening this month something that represented us seemed rather appropriate.
I liked the way that I did my block for September so repeated the process. The background of the block was painted onto the poplin with fluid acrylics and the butterflies were painted onto the medium weight interfacing.
I am not sure how much of the painted butterflies will end up showing since I will be beading them and probably adding some embroidery as well. I used some of my left over painted fusible web to add leaves to my background before collaging the butterflies on to the background.
I chose our favorite colors for our butterflies. My favorite color is purple and Wayne's is blue. Each butterfly has a bit of the other's color on it to show that we each have some of the other in us. Color is one area where you could get seriously bogged down in symbolism so I will include some of the meanings for each but not spend days or weeks trying to wade through all the available meanings of each color.
Dark blue carries the blue symbolism of importance, confidence, power, and authority. Darker shades of blue are associated with intelligence, stability, unity, and conservatism. Blue is the most common favorite color. Blue is seen as trustworthy, dependable, loyal, faithful, and committed. The color of sky and the ocean, blue is perceived as a constant in our lives. As the collective color of the spirit, it is restful and calming. Blue is the least "gender specific" color, having equal appeal to both men and women.
Purple embodies the balance of red stimulation and blue calm. A sense of mystic and royal qualities, purple is a color often well liked by very creative or eccentric types. It can be uplifting and calming to the mind and nerves. It is also considered to encourage creativity. Often considered a feminine color since it is a favorite color largely among women.
Now onto the symbolism of butterflies, two butterflies represent marital happiness. The butterfly represents transformation and metamorphosis; very appropriate since we are both going through periods of personal growth and change.
Butterflies are considered a symbol of the soul. Since they shift shape they are connected to the faerie realm. They remind us that transformation is inevitable and that growth and change do not have to be traumatic. They encourage creativity and freedom and encourage us to get up and move, life is a dance.
Since the symbolism in this block is strongly about both Wayne and I the ivy that was climbing up the tree decided to grow when I wasn't looking and has climbed onto this block. Ivy speaks of attachment, eternal friendship, fidelity, and wedded love making it a perfect addition to this block. It is also another feminine symbol to add to a long list of symbols in this project that are feminine.
My Web Gallery- Includes photos of both of my BJP pages
Artistic Kreations and Passions- my website
Sunday, September 14, 2008
Honu in Beads
Each of my pieces will be backed with a piece of dark purple felt. It will act as a frame so that the pieces will stand out from the collage and also give me a more substantial surface to work with. I also found that the stitching gives it a quilted look which I like.
Since I started planning this project I started looking for beads that I thought could work. Mostly this had included looking for leaf and flower beads I knew that I was going to include a honu and when I saw these mother of pearl shell beads I knew they would be perfect for the shell of the honu. I bought them in both a green and a beige. They were the first thing I added to this piece. Sort of like a puzzle I had to figure out what pieces would fit where to stay on the shell of the turtle. I filled in the rest of the shell with 15/0 beads so that the shell read as a whole better.
The next thing I added was the gold 15/0 beads as ripples in the water. I used the gold ripples of paint as a guide. I added a crystal sequin for the eye of the turtle. At this point it was time to follow my instinct. I considered adding more beads to the turtle but felt that I would lose the painting and overwhelm the piece. Instead I chose to add stitching to accentuate the scale like surfaces. I quickly found that satin stitch with cotton embroidery floss was perfect for the look I was after. I added variegated rayon thread to edge all of the scales. The last step was more ripples with more variegated rayon thread. I really love my block.
Turtles are connected to the feminine and are a symbol of the primal mother. They are a symbol of heaven and earth and help you unite the two in your life. They remind you that Mother Earth provides you with all of your needs and to take time for yourself.
They are keepers of the doors to the Faerie Realm. They help you awaken the senses on a physical and spiritual level and tell you when to go with the flow. They help you connect with your most primal essence letting you know when you need to go within your shell and only come out when your ideas are ready to expressed.
For my Sacred Tree piece part of what they are symbolizing for me is mothers. All mothers from my mother and mother-in-law to all of the other woman who have adopted me into their lives and given me support and love as I have lived in different areas. Also the motherhood of birthing new ideas and letting that creativity out into the world.
My Web Gallery- Includes photos of both of my BJP pages
Artistic Kreations and Passions- my website
Friday, September 12, 2008
Honu Swimming
It has almost taken me longer to get this piece posted than it do to do the piece. I swear it seems like my brain has melted lately. After 2 1/5 months of constant headaches I guess it makes sense although doesn't make it any more fun. I have been doing Physical therapy which is helping some.
On to more pleasant thoughts, Since this is the first block of the year I got to see if I would enjoy painting my blocks and then see about how I wanted to bead them. Like the photos that I used last year part of the challenge for this year will be balancing out the painting and the beading. I will also be using embroidery for the finer details.
I am using a poplin weight fabric as my "canvas". My first step was to prime it with acrylic medium. I am using Fluid acrylics mostly for my painting along with some of the different Jacquard brand fabric paints. This one was particularly easy to do since I didn't have any background details (like branches or roots) to include. I just sat down and had fun making a watery world for my honu to swim in. I layered a couple of different layers of techniques. One of the things I really like about the fluid acrylics is that you can treat them almost like watercolors. I enjoy working with watercolors but knew doing handwork on watercolors wouldn't work well.
After painting my background I copied my honu onto medium weight interfacing and painted it. using a separate layer for my honu allowed me to not have to mask out the space for it on my painting and to work in a more fluid way on the background. After she was painted I cut out my honu and then collaged her onto the background and then covered the whole piece with a coat of a thinned Lumiere paint which gave the hole a glistening quality like water.
I have a lot of information on symbolism of honu/turtles and will split it between the two posts for this piece. Honu is what the Hawaiians call the green sea turtles. We lived in Hawaii for 2 years (there are some nice advantages to moving with the military.) We went snorkeling a fair amount and found my times swimming with the Honu amazingly spiritual. I always felt calmer when I was with them. If you were calm and just being they would let you swim along with you often within touching distance. Since many of them are 4-5 feet long it is inspiring. I have them swim right towards me like they were as curious about me as I was about them. We have several pieces of art that include honu and they still call to me.
Sea Turtles symbolize the bravery of the young. They have a connection to the moon. They represent the ability to travel long distances to reach home (seems pretty appropriate with all of the moving and traveling I have done as a military spouse). They remind you of your duty to the completion of your life path. They symbolize wisdom, longevity, patience, tenacity, self-reliance and carrying your home on your back.
Sunday, September 7, 2008
A Mountain of Strength
I am sorry that it has been so long since my last update. I went to Bead Fest in Philly and had a great time and bought a whole lot of beads to use on this years BJP. More colors of 15/0s and a really nice selection of leaf and flower beads. I got home and immediately got sick with a really bad head cold and it has kept me completely down and out, just starting to feel like time on the computer again. Now if I could just get rid of the headaches.
The next part of my background is stitched although I will be adding more to this area as I have time. (waterfalls anyone?) More rayon machine thread for the stitching in this area. I am using a lot of threads meant for machine sewing on this project, partially since I have them and that saves me buying as much tread for all of the embroidery work.
Actually the mountain was Wayne's idea and I liked it. Based loosely on the Na Pali coast mountains on Kauai (one of the Hawaiian islands). Mountains have a lot of symbolism attached to them. They are the meeting place of heaven and earth, as this they also represent the stages of spiritual ascent and transcendence. Spiritual attainment can be ours as we overcome our obstacles. They are places of communion with spirits and deities and the realm of meditation. They are a masculine symbol (one of the very few that seem to be making it onto my piece). They also represent wisdom, solitariness, power, assertiveness, resurrection, freedom, peace, strength and majesty.
My Web Gallery- Includes photos of both of my BJP pages
Artistic Kreations and Passions- my website
Friday, August 22, 2008
Stitching Grass
Stitching grass, it just sounds so funny, Like taking little blades of grass and stitching on them. OK really I am not quite that nuts.
My Web Gallery- Includes photos of both of my BJP pages
Artistic Kreations and Passions- my website
I used painted green scrim (cheese cloth type fabric) The nice thing is that it is open enough to show the background through and fine enough to scrunch it some for areas of more density and texture. I think that I may be adding wildflowers to the rolling hills of my meadow. I am thinking of daisies and possibly other flowers as well.
One note on the symbolism that I am including, I am not going to include all of the possible symbolism to all of the parts, partially because their is a lot of symbolism to some of them and some have stuff that doesn't apply to me and my life and since this is a self portrait I am looking at what applies to me, especially on things like the landscape that I put in to make the piece complete and weren't as special or didn't have personal meaning to me.
That said let's start with grass. Green and lush grass is a symbol of a healthy land and fertility. It also symbolizes humble usefulness, utility, submission and the fleeting quality of life. I guess that means We only have so many years here to accomplish our passions and that we should make the best of our time. At least my grass is lush and green.
I couldn't decide exactly what type of geography this is so settled for rolling hills and meadow. Hills represent, aspirations, constancy, stability, innocent pleasures, freedom from care, eternity, fertility and is among 1 of the many feminine emblems in my piece. Meadows have some less happy connotations that I am skipping because this is a happy place. Along it's happier notes it represents peace, patience, dreaminess, gladness and is connected to the river of life.
My Web Gallery- Includes photos of both of my BJP pages
Artistic Kreations and Passions- my website
Monday, August 18, 2008
Moss at the Roots of my tree.
I have always loved moss and when Wayne and I are out hiking we often take photos of it. I love all of the different types of moss that are out there and all of the itty bitty details they have. They tend to grow in places that look inhospitable on the side of rock cliffs etc and I always appreciate that life can thrive no matter what kind of conditions there are.
My moss is made up of french knots, lazy daisy stitches as well as a scattering of straight stitches. They are the same stitches I used on my February BJP page only without any beads. I used a mix of rayon and cotton threads. I had already fused on a background of painted fusible web where I wanted the moss to go. The webbing as a background gives the moss a nice texture and depth.
Now for what it symbolizes, humility, service, friendship, boredom, a parasite and maternal love. I am sure that on the items where I have a ton of information I will edit it down to the ones that have meaning to me but I thought the 2 obvious ones that I would delete were kind of funny. Boredom, I don't ever remember being bored in my life. I love to read and creating gives me such joy that I couldn't consider what it would take to make me bored. I can't even get my brain to slow down enough to successfully meditate. The other is parasite, I don't look at moss as a parasite and sure hope that nobody thinks I am a parasite. I hadn't looked up the meanings behind moss before I included it on the piece and find it interesting that after what I wrote about the roots that I have put the moss at the base of the roots and that 2 of the things that moss represents is friendship and maternal love. I have a strong feeling that I am being guided on this project. Things that are meant to be will be.
Thursday, August 14, 2008
Getting to the Roots of the Matter
I haven't found as much informations written about the symbolism of roots yet but that is OK since I have plenty of personal meaning for them.
The symbolism that I could find for roots makes perfect sense. Being grounded and personal background are two that you would expect. I did find one that was interesting: it was that roots are the foundation, but that they did not necessarily imply stability.
OK now for the deep down and personal part of what roots have meant to me. December 11th, 1970 my parents adopted my brother sister and I. Two weeks before Christmas and they suddenly had a 1,2,and 3 year old. As the oldest I always knew that I was adopted. My parents got divorced when I was 6 and when I was 11 my Father died. There were times when I had trouble with every thing going on in my life and the loss. Although my Mother was always a stabilizing influence and loved me unconditionally there were many years in my teens and early 20's that I felt like I had no roots. It was like I had come out of nowhere at 3 years of age. I didn't remember anything before then and I felt a need for more.
I will start with what I did. The stitching is done with both a rayon thread and a cotton variegated embroidery floss. No particular stitches mostly a mix of this and that to get what I wanted.
The symbolism that I could find for roots makes perfect sense. Being grounded and personal background are two that you would expect. I did find one that was interesting: it was that roots are the foundation, but that they did not necessarily imply stability.
My Mom always supported my desire for more information but in small town Iowa getting even non-identifying information was next to impossible at that time. I didn't really want to meet my biological parents ( I had a great Mom) I just wanted to know where I came from. I went through a period of depression during college but through the love and support of Family and Friends I managed to get through it. I went through a lot of counseling during the summer between my junior and senior years in college and that helped.
The next fall I met Wayne and fell deeply in love. Wayne was very good for my self esteem which was not great when I met him. I had some trust issues and feared being abandoned. All of the things I went through taught me some very valuable lessons. I no longer needed to find out about my biological family because I could make my own roots. I already had a wonderful loving family, a man who loved me more than I had thought possible and through him even more family that loved and excepted me. I also had some great friends who had seen me through some tough times.
You can create your roots from what ever you want or need to. You don't need to have a family linage that you can trace back generations. I have added to my friends and family as we have moved around and now I have a foundation that is built with all of the love that we give to each other. I reach out my roots to all I love and now have a foundation that is very strong and deep.
My Web Gallery- Includes photos of both of my BJP pages
Artistic Kreations and Passions- my website
My Web Gallery- Includes photos of both of my BJP pages
Artistic Kreations and Passions- my website
Sunday, August 10, 2008
Ocean Waves
Water is the primal life source and represents our spiritual life and our emotions. All life sprang from the oceans. It is the symbol of the womb, motherhood and feminine energies. The Ocean in a dynamic force and is constantly in transition representing the sum total of possibilities. This is where we find our sub-conscious mind and even our unconscious mind. The ocean is a dynamic force and represents universal life, spiritual exploration, time, and eternity. Ocean swells symbolize activity in our unconscious mind. Waves are for regeneration and dreams.
The waves of my ocean are done with different metallic threads. I have learned several things with working with metallic threads. For the mylar type of threads work with short lengths, don't pull to hard and be careful not to pierce the thread. Although the thread breaks fairly easily it does give lovely sparkle and is easier to hand stitch then you might think. All metallic threads seem to do better in shorter lengths and with regular knots on the back in case of breakage.
I chose to add a bit of surf to my ocean by using some white netting and a pale blue sheer ribbon. I kept breaking threads while attaching it and finally figured that cotton was the best because it was a bit stronger to pull the scrunched up netting in. Regular knots on the back helped, too.
For the most recent photos of my project go to My Web Gallery or Artistic Kreations and Passions.
The waves of my ocean are done with different metallic threads. I have learned several things with working with metallic threads. For the mylar type of threads work with short lengths, don't pull to hard and be careful not to pierce the thread. Although the thread breaks fairly easily it does give lovely sparkle and is easier to hand stitch then you might think. All metallic threads seem to do better in shorter lengths and with regular knots on the back in case of breakage.
I chose to add a bit of surf to my ocean by using some white netting and a pale blue sheer ribbon. I kept breaking threads while attaching it and finally figured that cotton was the best because it was a bit stronger to pull the scrunched up netting in. Regular knots on the back helped, too.
For the most recent photos of my project go to My Web Gallery or Artistic Kreations and Passions.
Wednesday, August 6, 2008
Stitching Up A Fern
The stitching has started so I am guessing that my posts will probably start coming a bit farther apart since the embroidery work will take a bit longer to do. I have had a headache everyday since the second week in July so things are going a bit more slowly than I might like. I have also been working on a couple of other projects which you can see if you go to my main blog.
I am not sure yet how I will break up all of the stitching blog entries but I think the first couple are going to be by area. That may not work for all of the areas of the piece since I have been doing the handwork in whatever area I was in the mood for so far.
I am using a variety of threads so far for my stitching. For the ferns I used rayon sewing thread and metallic sewing thread both from Sulky. I have been using several different embroidery stitches and some sort of free form embroidery stitches. I am not to worried about whether a stitch is done just so or if it is even a "real" embroidery stitch. I am very much after getting the look and feel I am after. I think having no formal training in embroidery is only to my advantage, not that I have ever been very good about falling the rules. I think in Art rules make good guidelines but are meant to be bent and broken. A favorite quote "We must be fluid, flexible is too rigid" not sure who said it but sure describes some of my design philosophy.
The stitched area that we are going to look at is the ferns that are growing at the base of my tree. I decided to add the ferns and some other items without looking up the symbolism first. I love ferns and find them fascinating plants. They are ancient plants and grow from spores and not seeds. I love seeing the furled up fiddle heads as they grow. A forest floor blanketed in ferns feels very peaceful to me and I love to take photos of ferns when I can.
Ferns symbolism includes magic, fascination, confidence, sincerity, endurance and shelter. It is interesting that looking at the symbolism I probably would have chosen the ferns anyway but the ferns came first. They are on the secret door which leads to the other side giving me the magic and confidence to open the door and see what it reveals.
For the most recent photos of my project go to My Web Gallery or Artistic Kreations and Passions.
Sunday, August 3, 2008
A Door Takes Form
In my last post you read about the door getting cut out of the main collage. Part of the reason I chose to do this instead of making a separate door was because I wanted the door to blend into the tree and be somewhat secret.
I started my stitching on the door because it was a manageable size and so that I had a better idea where I wanted to go with the stitching. I used rayon machine thread and embroidery floss and cotton embroidery floss. Some of these are variegated which adds a nice realism to the piece. I started with the wood of the tree, the fern and moss bits were next and last was adding the ivy which is waxed cotton cord couched on with rayon thread and a few stitched tendrils and interfacing ivy leaves. The leaves are only stitched along the center vein so the edges are free
I wanted to use the brass hinges because they would stand out. I want the door to be somewhat of a secret but not completely. I found these and the latch at Michaels, I was hoping I could find them small enough and I did, but how to attach them. I could have just stitched them on but wanted them to look more door like so I found some small brads for scrap booking and used them instead of screws to attach the hinges and latch. To give my door some stability and to help support the brads I used Tacky Tape to attach a piece of card stock to the inside of the door and then cut small holes for the brads and opened them up.
I wanted to have the inside of the door to look like real wood and since I have done some Marquetry for the ottomans my husband made for our living room I happened to have a collection of wood veneers on hand. I painted both sides with clear acrylic to protect the other surfaces from the acids in the wood. I used more of the double stick tape to attach the wood to the inside of the door.
Now I have a really cool door for my piece. If the rest of the piece looks half as good as the door I will be so happy. I LOVE IT!
For the most recent photos of my project go to My Web Gallery or Artistic Kreations and Passions.
Wednesday, July 30, 2008
A Secret Takes Shape
I will start this post suggesting that if you haven't read my July 13th post, specifically the second half "It's A Secret" that you do so you have some idea where this is coming from.
I measured and drew where I wanted my blocks to sit on the piece. Since I am painting the blocks I am including the landscape in the paintings so I have to have the placement settled so that I include the correct parts of the landscape in the paintings. I am going to do stitching/embroidery on the collage so this also lets me know where not to stitch. After I had all of these marked it was time to mark where my secret door was going to be. I felt a bit of trepidation at this point because not only was I marking this on the piece, (unlike the other markings it isn't going to be covered up) I was going to cut the door out of the main collage. Yes I actually cut a hole in my collage. In the 2nd photo you can see, yes there is now a whole in my collage.
In my July 13th post I mentioned that my current idea for the inside of the secret door was a mosaic of mirrors. In the last 2 photos you can see where I am on them and what it will potentially look like. I will need to get more of the Delicas that I am using for the beaded bezels when I go to Bead Fest in Philly. I haven't run out yet but will before I get all of the mirrors done. I am using peyote stitch to create the bezels using Delicas and 13/0 charlottes (sp?).
After I bezeled the first mirror I butted the next one up to it and used the connecting side as part of the bezel just adding a new lip for the new mirror. I think I am going to like the effect of this .
I don't have to decide on this yet since it won't be attached to the piece for a while yet.
Remember if you want to sign up for e-mail alerts when I have a new post you can sign up with Feedblitz on the top right of the page. For the most recent photos of my project go to My Web Gallery or Artistic Kreations and Passions.
Sunday, July 27, 2008
The Tree Is Planted And Gets More Leaves
After lots of fun and experimentation I was ready to collage my tree onto the landscape collage. I used more acrylic matte medium/water mix. I covered the surface of the collage with the mix, placed the tree on top of that and then brushed more collage over that. I added 2 more coats of the medium to firmly secure the tree to the background.
I liked the effect that I got from the fusible web leaves so much that I painted some more for the middle layer of leaves, these would go over parts of the branches and the trunk of the tree.
The second photo is of the painted fusible web once I pulled it off of it's paper backing. You can see the grid of my cutting board through the webbing.
The next photo is detail after I added the new webbing "leaves". It gives the tree that extra bit of depth and more realism. I am really liking how all of this is turning out. The project has kept me very excited from the first and I have never gotten bored, blocked or felt anything but joy with it.
To show my joy with the piece I decided to use some pressed flowers that I found on clearance at Michael's during one of my visits there. It does give the collage a more festive spring/summer feel.
For the most recent photos of my project go to My Web Gallery or Artistic Kreations and Passions.
Thursday, July 24, 2008
Leafing Out
More painted interfacing, this time painted mostly in greens. After making the tree with the painted interfacing and liking the way it felt and looked I decided that it would make good leaves. Most of the other ideas I had were going to have larger leaves than I thought I was going to want on the finished project. With the interfacing I could make them any size that I wanted.
I drew the leaves with permanent pens and after drawing out a group of them I would cut them out. I have done this so far in several different sessions so that I wouldn't get bored doing them. Besides the leaves for the tree I wanted to have ferns and Ivy on the piece so I drew those leaves as well. The fern leaves I drew onto the back and once they were cut out I flipped them over I had the parts for my fern.
I may need to make more leaves but since until I start sewing them on I don't have a very good idea how far they will go. I have more of the painted interfacing so I can make more as I need them. The fern leaves will be collaged on with the tree, the ivy and tree leaves will be stitched on when I do the embroidery work for the collage.
For the most recent photos of my project go to My Web Gallery or Artistic Kreations and Passions.
Monday, July 21, 2008
Every Tree Needs Leaves
My tree wouldn't be very healthy looking with out some leaves now would it? I have had so many ideas for what to do for the leaves of this piece and there was no way I could use all of them. I really liked the way the painted fusible web looked and thought that it would work great for background leaves for the tree. When you look at a tree, all you see of the leaves further back is color and pattern so the fusible web would work great to give me that. In my post on July 10th I discussed painting the fusible web. I could have cut out shapes and fused those onto the landscape but I wanted an organic feel so I pulled the fusible web off of the backing paper (a butter knife or a bead scoop helps those areas where it wants to stick to the paper) and tore the fusible up into smaller pieces.
I did the fusible in more than one layer. I first put down a layer and used parchment paper to fuse the web to the background. Already I was liking the effect, getting the effects I was getting would be very challenging if you were just trying to paint directly on the surface of the piece. After I fused the first layer I placed the tree on top so that I could make sure I had leaves behind all of the branches, even the lower ones.
I ended up with 3 layers of fusing the web on, the layers overlapped and the colors/values melded together when they were fused. The parchment paper worked great for the fusing. Once I fused the web on I let the parchment cool a little so the web didn't stick to the paper. As you can see from the last photo where I just placed the tree on top to see how it looked already the tree looks happier.
For the most recent photos of my project go to My Web Gallery or Artistic Kreations and Passions.
Subscribe to:
Posts (Atom)